上一篇我们完成了nodejs的环境安装,并且利用wordpress官方的脚手架工具快速创建了一个测试插件testplugin,它的目录结构如下
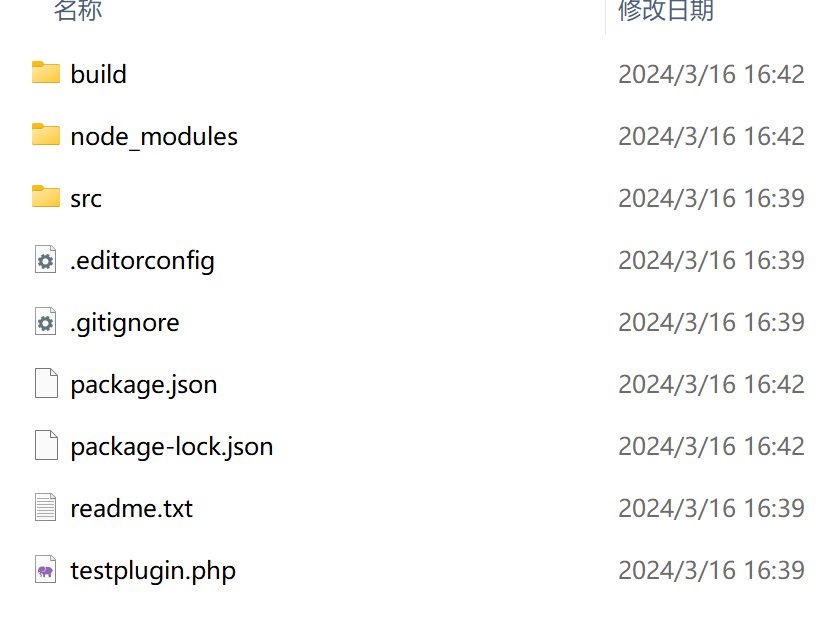
其中,build目录是经过nodejs打包构建后的目录,简单来说它就是给用户运行的插件目录之一。node_modules是nodejs构建需要的支持库模块。src就是你需要编写代码的插件目录。package.json存放了你的插件包的信息,如下
{
	"name": "testplugin",
	"version": "0.1.0",
	"description": "Example block scaffolded with Create Block tool.",
	"author": "The WordPress Contributors",
	"license": "GPL-2.0-or-later",
	"main": "build/index.js",
	"scripts": {
		"build": "wp-scripts build",
		"format": "wp-scripts format",
		"lint:css": "wp-scripts lint-style",
		"lint:js": "wp-scripts lint-js",
		"packages-update": "wp-scripts packages-update",
		"plugin-zip": "wp-scripts plugin-zip",
		"start": "wp-scripts start"
	},
	"devDependencies": {
		"@wordpress/scripts": "^27.4.0"
	}
}不一一介绍了,自己去查吧。还有一个与插件名同名的PHP文件testplugin.php,这个文件是wordpress注册插件的入口文件,你可以在这里编写插件的后台PHP代码,该文件自动生成了注册build目录下的块编辑器插件。
<?php
/**
 * Plugin Name:       Testplugin
 * Description:       Example block scaffolded with Create Block tool.
 * Requires at least: 6.1
 * Requires PHP:      7.0
 * Version:           0.1.0
 * Author:            The WordPress Contributors
 * License:           GPL-2.0-or-later
 * License URI:       https://www.gnu.org/licenses/gpl-2.0.html
 * Text Domain:       testplugin
 *
 * @package           create-block
 */

if ( ! defined( 'ABSPATH' ) ) {
	exit; // Exit if accessed directly.
}

/**
 * Registers the block using the metadata loaded from the `block.json` file.
 * Behind the scenes, it registers also all assets so they can be enqueued
 * through the block editor in the corresponding context.
 *
 * @see https://developer.wordpress.org/reference/functions/register_block_type/
 */
function testplugin_testplugin_block_init() {
	register_block_type( __DIR__ . '/build' );
}
add_action( 'init', 'testplugin_testplugin_block_init' );
如果你不喜欢在发布版中使用build目录,可以在这里修改。
将以下文件和目录上传到wordpress插件目录中,即可在wordpress后台看到该插件。
这里重点说说src这个开发文件所在目录
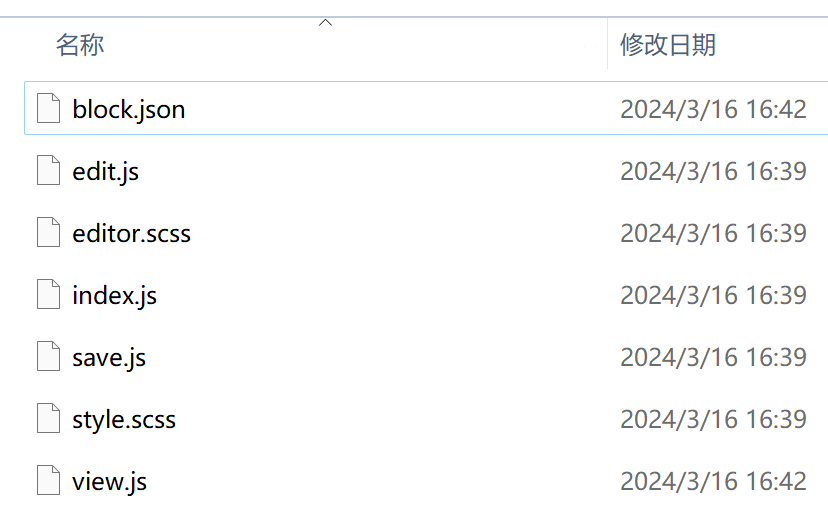
block.json存放块的基本信息,里面包含很多东西
{
	"$schema": "https://schemas.wp.org/trunk/block.json",
	"apiVersion": 3,
	"name": "create-block/testplugin",
	"version": "0.1.0",
	"title": "Testplugin",
	"category": "widgets",
	"icon": "smiley",
	"description": "Example block scaffolded with Create Block tool.",
	"example": {},
	"supports": {
		"html": false
	},
	"textdomain": "testplugin",
	"editorScript": "file:./index.js",
	"editorStyle": "file:./index.css",
	"style": "file:./style-index.css",
	"viewScript": "file:./view.js"
}
重点要介绍category这个属性,它支持如下类型
- text– 文字,
- media– 媒体,
- design– 设计,
- widgets– 小工具,
- theme– 主题,
- embed– 嵌入。
没错,就是在wordpress后台使用Gutenberg编辑器查看所有块中出现的分类,这里填的内容决定你的块出现在哪里。
supports中的html表示是否支持html编辑块
还有别的属性这里默认没有,比如常用的attributes
{
	"$schema": "https://schemas.wp.org/trunk/block.json",
	"apiVersion": 3,
	"name": "create-block/testplugin",
	"version": "0.1.0",
	"title": "Testplugin",
	"category": "widgets",
	"icon": "smiley",
	"description": "Example block scaffolded with Create Block tool.",
	"example": {},
	"supports": {
		"html": false
	},
       "attributes": {
		"result": {
		  "type": "object"
		},
		"theme": {
			"type": "string"
		  }
        }
	"textdomain": "testplugin",
	"editorScript": "file:./index.js",
	"editorStyle": "file:./index.css",
	"style": "file:./style-index.css",
	"viewScript": "file:./view.js"
}
你也可以自定义,在编辑js的时候可以方便的使用这些数据。
最后的几个css自己看名字应该就知道了。它们的内容对应editor.scss和style.scss。
一个简单的插件只需要关注两个文件,edit.js和save.js,它们分别对应编辑器的编辑操作和保存操作,编辑操作只会存储到后台,保存操作才会输出到前端。
当你在后台启用这个插件后,打开一篇文章使用Gutenberg编辑器编辑,可以在小工具中看到一个名为Testplugin的小工具。在编辑器中添加它,它会在编辑器中输出一串文字
Testplugin – hello from the editor!
该内容由edit.js文件中的Edit方法生成。
export default function Edit() {
	return (
		<p { ...useBlockProps() }>
			{ __( 'Testplugin – hello from the editor!', 'testplugin' ) }
		</p>
	);
}save.js文件中的save方法用来保存内容到前端数据库中
export default function save() {
	return (
		<p { ...useBlockProps.save() }>
			{ 'Testplugin – hello from the saved content!' }
		</p>
	);
}
你可以删除save中的内容如下
export default function save() {
	return (
		<p { ...useBlockProps.save() }>
			/*删除代码*/
		</p>
	);
}
然后使用如下命令重新生成代码,再发布到wordpress。
npm run build
此时在编辑器中块能正常显示内容,但前端不会显示。
注意:文章各个文件的作用仅做快速记忆,也不是必须这样使用,如果要深究请自行查阅官方api文档

评论 (0)