前面一章我们已经知道最基本的C#使用GDI绘制矩形的实现过程,不清楚的看这篇文章C#使用GDI在图像中绘制感兴趣区域ROI,那么今天来进阶学习下如何移动画好的矩形框,如何改变画好的矩形框大小。
C#使用GDI绘制可以移动、改变大小的矩形框
实现原理
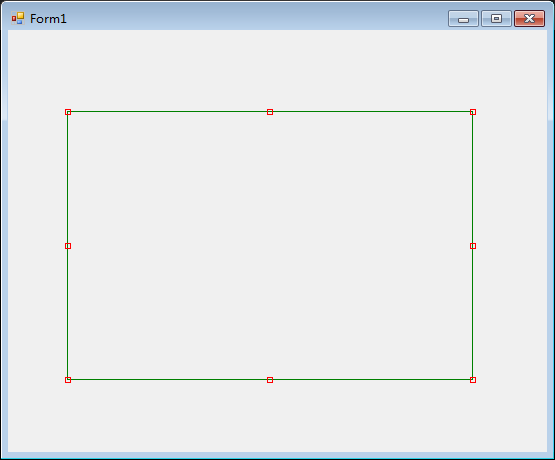
首先绘制一个矩形框,这个很简单,一句话即可。然后根据绘制的矩形框坐标,绘制8个调整矩形框大小的小点。上图中是绘制了8个小矩形,你也可以创建8个标签来实现。
首先是移动,移动操作是鼠标控制的,因此,我们只需判断鼠标是否进入了矩形框范围,就可以确定是移动图形还是不操作。
改变图像大小比较复杂,主要是对调整大小后的矩形坐标进行计算,从而确定新矩形位置,并同步绘制。
为了方便大家使用,这个项目已经写成了一个类,代码如下:
复制
using System;
using System.Collections.Generic;
using System.Text;
using System.Drawing;
using System.Drawing.Drawing2D;
using System.Windows.Forms;

namespace UserRectDemo
{
public class UserRect
{
private PictureBox mPictureBox;
public Rectangle rect;
public bool allowDeformingDuringMovement=false ;
private bool mIsClick=false;
private bool mMove=false;
private int oldX;
private int oldY;
private int sizeNodeRect= 5;
private Bitmap mBmp=null;
private PosSizableRect nodeSelected = PosSizableRect.None;
private int angle = 30;

private enum PosSizableRect
{
UpMiddle,
LeftMiddle,
LeftBottom,
LeftUp,
RightUp,
RightMiddle,
RightBottom,
BottomMiddle,
None

};

public UserRect(Rectangle r)
{
rect = r;
mIsClick = false;
}

public void Draw(Graphics g)
{
g.DrawRectangle(new Pen(Color.Red),rect);

foreach (PosSizableRect pos in Enum.GetValues(typeof(PosSizableRect)))
{
g.DrawRectangle(new Pen(Color.Red),GetRect(pos));
}
}

public void SetBitmapFile(string filename)
{
this.mBmp = new Bitmap(filename);
}

public void SetBitmap(Bitmap bmp)
{
this.mBmp = bmp;
}

public void SetPictureBox(PictureBox p)
{
this.mPictureBox = p;
mPictureBox.MouseDown +=new MouseEventHandler(mPictureBox_MouseDown);
mPictureBox.MouseUp += new MouseEventHandler(mPictureBox_MouseUp);
mPictureBox.MouseMove += new MouseEventHandler(mPictureBox_MouseMove);
mPictureBox.Paint += new PaintEventHandler(mPictureBox_Paint);
}

private void mPictureBox_Paint(object sender, PaintEventArgs e)
{

try
{
Draw(e.Graphics);
}
catch (Exception exp)
{
System.Console.WriteLine(exp.Message);
}

}

private void mPictureBox_MouseDown(object sender, MouseEventArgs e)
{
mIsClick = true;

nodeSelected = PosSizableRect.None;
nodeSelected = GetNodeSelectable(e.Location);

if (rect.Contains(new Point(e.X,e.Y)))
{
mMove = true;
}
oldX = e.X;
oldY = e.Y;
}

private void mPictureBox_MouseUp(object sender, MouseEventArgs e)
{
mIsClick = false;
mMove = false;
}

private void mPictureBox_MouseMove(object sender, MouseEventArgs e)
{
ChangeCursor(e.Location);
if (mIsClick == false)
{
return;
}

Rectangle backupRect = rect;

switch (nodeSelected)
{
case PosSizableRect.LeftUp:
rect.X += e.X - oldX;
rect.Width -= e.X - oldX;
rect.Y += e.Y - oldY;
rect.Height -= e.Y - oldY;
break;
case PosSizableRect.LeftMiddle:
rect.X += e.X - oldX;
rect.Width -= e.X - oldX;
break;
case PosSizableRect.LeftBottom:
rect.Width -= e.X - oldX;
rect.X += e.X - oldX;
rect.Height += e.Y - oldY;
break;
case PosSizableRect.BottomMiddle:
rect.Height += e.Y - oldY;
break;
case PosSizableRect.RightUp:
rect.Width += e.X - oldX;
rect.Y += e.Y - oldY;
rect.Height -= e.Y - oldY;
break;
case PosSizableRect.RightBottom:
rect.Width += e.X - oldX;
rect.Height += e.Y - oldY;
break;
case PosSizableRect.RightMiddle:
rect.Width += e.X - oldX;
break;

case PosSizableRect.UpMiddle:
rect.Y += e.Y - oldY;
rect.Height -= e.Y - oldY;
break;

default:
if (mMove)
{
rect.X = rect.X + e.X - oldX;
rect.Y = rect.Y + e.Y - oldY;
}
break;
}
oldX = e.X;
oldY = e.Y;

if (rect.Width < 5 || rect.Height < 5)
{
rect = backupRect;
}

TestIfRectInsideArea();

mPictureBox.Invalidate();
}

private void TestIfRectInsideArea()
{
// Test if rectangle still inside the area.
if (rect.X < 0) rect.X = 0;
if (rect.Y < 0) rect.Y = 0;
if (rect.Width <= 0) rect.Width = 1;
if (rect.Height <= 0) rect.Height = 1;

if (rect.X + rect.Width > mPictureBox.Width)
{
rect.Width = mPictureBox.Width - rect.X - 1; // -1 to be still show
if (allowDeformingDuringMovement == false)
{
mIsClick = false;
}
}
if (rect.Y + rect.Height > mPictureBox.Height)
{
rect.Height = mPictureBox.Height - rect.Y - 1;// -1 to be still show
if (allowDeformingDuringMovement == false)
{
mIsClick = false;
}
}
}

private Rectangle CreateRectSizableNode(int x, int y)
{
return new Rectangle(x - sizeNodeRect / 2, y - sizeNodeRect / 2, sizeNodeRect, sizeNodeRect);
}

private Rectangle GetRect(PosSizableRect p)
{
switch (p)
{
case PosSizableRect.LeftUp:
return CreateRectSizableNode(rect.X, rect.Y);

case PosSizableRect.LeftMiddle:
return CreateRectSizableNode(rect.X, rect.Y + +rect.Height / 2);

case PosSizableRect.LeftBottom:
return CreateRectSizableNode(rect.X, rect.Y +rect.Height);

case PosSizableRect.BottomMiddle:
return CreateRectSizableNode(rect.X + rect.Width / 2,rect.Y + rect.Height);

case PosSizableRect.RightUp:
return CreateRectSizableNode(rect.X + rect.Width,rect.Y );

case PosSizableRect.RightBottom:
return CreateRectSizableNode(rect.X + rect.Width,rect.Y + rect.Height);

case PosSizableRect.RightMiddle:
return CreateRectSizableNode(rect.X + rect.Width, rect.Y + rect.Height / 2);

case PosSizableRect.UpMiddle:
return CreateRectSizableNode(rect.X + rect.Width/2, rect.Y);
default :
return new Rectangle();
}
}

private PosSizableRect GetNodeSelectable(Point p)
{
foreach (PosSizableRect r in Enum.GetValues(typeof(PosSizableRect)))
{
if (GetRect(r).Contains(p))
{
return r;
}
}
return PosSizableRect.None;
}

private void ChangeCursor(Point p)
{
mPictureBox.Cursor = GetCursor(GetNodeSelectable(p));
}

/// <summary>
/// Get cursor for the handle
/// </summary>
/// <param name="p"></param>
/// <returns></returns>
private Cursor GetCursor(PosSizableRect p)
{
switch (p)
{
case PosSizableRect.LeftUp:
return Cursors.SizeNWSE;

case PosSizableRect.LeftMiddle:
return Cursors.SizeWE;

case PosSizableRect.LeftBottom:
return Cursors.SizeNESW;

case PosSizableRect.BottomMiddle:
return Cursors.SizeNS;

case PosSizableRect.RightUp:
return Cursors.SizeNESW;

case PosSizableRect.RightBottom:
return Cursors.SizeNWSE;

case PosSizableRect.RightMiddle:
return Cursors.SizeWE;

case PosSizableRect.UpMiddle:
return Cursors.SizeNS;
default:
return Cursors.Default;
}
}

}
}
简单使用
在vs中新建一个类,复制上面的代码,然后在窗体代码中使用如下代码使用:
复制
rect = new UserRect(new Rectangle(10, 10, 100, 100));
rect.SetPictureBox(this.pictureBox1);
注意:由于封装类中写死了画板是pictureBox控件提供的,所以我们必须使用pictureBox控件来绘图,向你的项目中拖入一个pictureBox控件即可使用。
通过修改allowDeformingDuringMovement属性来实现变形,貌似原作者并没写变形,看不出效果。
最后再吐槽一下,百度资料真的难查,找了一天都没找到,谷歌5分钟不到就找到了…..坑爹!

评论 (3)